Contact me

confessionsofasinger@hotmail.com

Seguidores

Mostrando entradas con la etiqueta costura. Mostrar todas las entradas

martes, 31 de agosto de 2010

X gone Y 12: Two of a Kind


La falda de media capa es bastante sencilla.

Para averiguar el largo del radio, solo has de hacer esta sencilla ecuacion: Semiperimetro de cintura/PI

Puedes hacerla del largo que quieras, y siempre queda bien. Yo por ejemplo he elegido dos largos.


El largo por encima de la rodilla y


el largo por el tobillo,


que sigo diciendo son un must de esta temporada.


La distancia desde la cintura al largo la eliges Tu.

Juega con ella.

Y estas tres faldas las puedes encontrar en X gone Y.

Con ofertas y un modico precio.

Echale un vistazo. Es gratis....

lunes, 22 de febrero de 2010

We're the weirdos, mister.

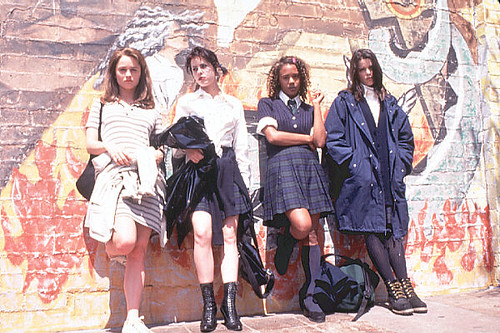
I'm a person who gets a lot to get inspired with something, but the last time I watched The Craft I was watching it throw a brand new light.
The plot is kind of lame so I can't remember it properly. A bunch of teens filled of issues and use magic to go throw them... whatever.

When I was a teen I think there was a moment I thought it was worth of something, because I actually found a tape of it in the garage a couple of years ago.

I suppose we all had dark times and were lame and felt identified with the urban pseudo-punk decadence of the depressive preppy girls. Didn't you? Just me? Whatever...

The thing is that this time I was more interested in the outfits, I mean, how comes I hadn't notice how great they were before? Ok, that's a lie, maybe I kinda sported Docs with a plaid skirt when I was 12. Maybe my mom gave me a long speech of her concept of Do and Don't in fashion for a young lady, but we had that conversation thousand of times along my life and maybe I'm just making it up and she just told me to stop wearing that outfit... and my answer surely was a huge whatever again, tons of communication back then.

But now I'm older, and my mom gave up on me and my fashion sense when I was 16 and I thought that Courtney Love, Debbie Harry, Linda Perry and the rest of the 4 non Blondes, Angelina Jolie, Kathleen Hanna and Helena Bonham Carter were some of the most awesome and greatest-best dressed women in Earth... I think you can get the picture...; so I watched the flick and I actually got inspired. Miracle! And I was so happy that the skirt worked out that I needed to share with you the idea.


Something inspired in the fashion decay proper of the nineties in a prep school that Neve Campbell and the rest of the cast pulls out in an awesome way.

So I joined together two concepts: the plaid fabric and also the skirt I loved this season: the bandage skirt.

I bought like six of them along the winter in different colors and models, but my favorite is the bandage skirt of pieces. I found one in Zara but it was elastic and experimenting I was wondering if I could make a bandage skirt of pieces but not elastic.

And it actually worked and is kind of easy so here you have the first part of the tutorial.

You're going to need:

The skirt pattern.

Scissors

A tape measure

A pencil or a pen

Enough fabric for make a skirt and a metre more.

Instructions:

1. Cut the pattern of your skirt in four pieces

2. Measure under your butt all the way throw your tights.

3. Measure your tights.

4. Measure over your knees.

This last three measurements are the ones we're going to use in each new piece.

1. The first piece:

Waist x 2cm + 10cm x hips +2cm x 14cm

2. The second piece

Hips + 2cm x 14cm x Measure under your butt + 2cm x 14cm

3. The third piece:

Measure of under your butt + 2cm x 10cm x measure of tights +2cm x 10cm

4. The fourth piece:

Measure of your tights + 2cm x 10 cm x measure of over your knees +2cm x 10cm

Now you must give the skirt the form of your body with the burmester ruler. You need to do it in the right side of the pattern because the left one is the one who is going to go double over the fabric.
Soon how to cut and sew this kind of skirt

------


NOTA: RECUERDA QUE LOS RECTANGULOS DE LAS IMG SON SOLO ILUSTRATIVOS, AL CORTAR EL PATRON EN CUATRO PIEZAS TENDRA LA FORMA DE LA FALDA RECTA, POR LO QUE AFINAREMOS EL COSTADO DONDE VA EL MARGEN DE COSTURA CON LA REGLA BURMESTER PARA DARLE LA FORMA DE UNA FALDA TUBO.

Para cualquier duda, deja tu mail y respondere lo antes posible :D


Pronto: Cómo coser y cortar la falda de piezas

martes, 26 de enero de 2010

Like a lady


Me volvi loca por las pajaritas y lazos la temporada pasada, hasta el punto que hice un gran numero con remains de otras cosas que habia cosido.

Y esta temporada no iba a ser menos. He cogido restos de vestidos, bajos de faldas, sobras de sisas, etc y me he pasado media tarde cosiendo mini pajaritas para iluminar los looks de esta primavera, y por que no, lo que quede invierno. Porque lo mejor de los colores y estampados estridentes es que en pequeñas dosis puedes llevarlos todo el año. Si, soy muy clásica y suelo reservar los estampados de colores para los vestidos y shorts en verano.

Lo unico que necesitas es un trozo de tela mayor de 8x8, mas que nada para que la pajarita sea visible y vistosa.

Lo suyo es hacer un rectángulo de por ejemplo 10x5 ó 8x5.

1. Investiga y frunce la tela hasta conseguir el efecto deseado y las medidas deseadas.

2. Recortar el pedazo que deseamos dos veces, dejando un margen de costura de 1cm por todos los lados. Es importante que marques la linea de costura ya que la gracia de las pajaritas es que las lineas sean rectas.

3. Cose los rectángulos por la linea de costura dejando sin coser un espacio lo suficientemente grande para que te quepan dos dedos.

4. Una vez cosido, recorta 0'5cm del margen de costura.

5. Vuelve el rectangulo del reves asi estara del derecho.

6. Cose a mano el trozito que queda.

7. Plancha el rectángulo hasta que quede recto.

8. Mide la circunferencia de tu cuello y haz una tira de 5cm mas larga. Recuerda que la tirita ha de ser fina, mi consejo si no sabes mucho de costura es que utilices un lazo o cinta fina. De esas que venden en las mercerias, son baratas y el resultado sera mucho mejor.

9. Cose un corchete a mano en cada lado de la cinta. A una medida que no te sea molesta, por eso la cinta es 5cm mas larga.

10. Saca una tira ancha de la misma tela de la pajarita.

11. Frunce el rectángulo por el medio para darle el efecto deseado y sujétalo con la tirita ancha y cóselo a mano por la parte de atras.

12. Une esta tirita a la cinta por el medio.

Et, voila. Ya tienes tu pajarita... o lacito. Lo que tu prefieras ;D

Recuerda, que si quieres un broche o un gancho para el pelo solo tienes que eliminar la tirita del cuello y añadir un imperdible o una horquilla.


---------------------------------------------------------------


I was mad about bows last season, I did a lot of them with remains of things I had sew. And this season wouldn't be less. I took rests of dresses, hems of skirts and other different remains so I spent half of the afternoon making bows for light the looks of this spring, and what the heck, for the rest of the winter, cause I think there's nothing better than a touch of color in a dark outfit. Yeah, I'm kinda classic and I use to wear dark clothes in winter.

The only thing you need is a piece of fabric bigger than 8x8cm, because if not, the bow wouldn't be enough eye catching. You need to make a rectangle of around 10x5 or 8x5 (Always in cm)

1. Cut the piece you want twice, leaving a sewing hem of 1cm in every side of the rectangle. Is important you mark the sewing line, because this way you would be able to sew straight lines with this help.

2. Sew the rectangles over the sewing line, setting the fabric face to face and leaving a space without sewing so you could introduce your fingers inside and turn the fabric upside-down. 3. Once you had sew it, cut 0.5cm of the sewing line and turn the rectangle upside down and sew by hand the space left. Afterwards, iron the rectangle.

4. Measure your neck circumference and and use a thin lace to make a strip 5cm longer and sew a hook and eye in the hems of it.

5. Make a shorter of around 5x3cm strip of the same fabric as the bow.

6. Gather the rectangle in the middle of it with the help of the strip and give it the desired touch. Sew it by hand in the back of the bow.


7. Sew together the strip and the bow. And you have your own bow tie, bow.

Remember that if you eliminate the strip you can also make a cute hair slide or brooch. You just need to sew the bow to a pin or a hair pin.

martes, 12 de enero de 2010

Coser la falda/ Sew the skirt.


Finalmente mientras cosia el domingo me decidi ha hacer las fotos y subirlas.

Ya hemos cortado los patrones, asi que coser la falda es realmente fácil.

Instrucciones:
1. Coser las cuatro pinzas. Es sencillo, solo tienes que juntar los dos cantos y coser por la linea como aparece en la foto de al lado.

2. Planchar las pinzas. Se plancharan hacia un costado, es decir, doblando la tela de la pinza hacia un lado y planchando hasta que el triangulito (Que es la pinza) se quede a ese lado.

3. Una vez cosidas y planchadas todas las pinzas colocaremos el aseo. Para colocarlo lo pondremos derecho con derecho y coseremos por el lado del reves.
Una vez cosido, lo meteremos todo hacia dentro y plancharemos las costuras y el aseo para que se quede por la parte de dentro.

4. Colocar la cremallera invisible en el lado de la cremallera.

5. Plancharemos las costuras. Esta vez, las abriremos a los lados, es decir, doblando el lado derecho sobre el lado derecho y el izquierdo sobre el izquierdo, y plancharemos. No te preocupes por la cremallera, no pasa nada si planchas por encima.

6. Coseremos el otro costado de la falda. La colocacion de la tela sera derecho con derecho otra vez, asi pues coseremos por el reves de la falda para que la costura se quede por dentro.

7 Planchar las costuras.

8. Coser el bajo a la medida deseada.

9. Planchar la prenda repasando las costuras y la falda en si. Si la has sobado mucho, deberias lavarla y luego planchar otra vez sobre las costura.

Y ya esta tu falda.


martes, 15 de diciembre de 2009

Como cortar la falda/How to cut the skirt

Lo primero que necesitas tener en cuenta siempre que hagas un patron es que luego la coseremos, por lo que debes dejar un margen de costura.

SIEMPRE.

El margen de costura adecuado es de un centimetro para los costados y dos centimetros para el bajo y la cintura.

En el caso de la falda, los pasos a seguir son los siguientes:

1) Doblar la tela por la mitad, dejando el derecho en el interior. La parte donde aparece la doblez, la llamamos lomo.

2) Colocar el patron por la parte recta contra el lomo.

3) Sujetar con alfileres. Utilizar los minimos posibles, porque dependiendo de la tela se quedaran mas o menos agujeros.

4) Utilizar un lapiz, boli bic o una tiza para tela para marcar el patron en la tela.

5) Antes de cortar,deberas marcar otra linea de 1cm en los costados y 2cm en el bajo y la cintura. Recuerda que no has de marcar en el lado doblado de la tela, ya que este servira como lado per se.

6) Ahora recortar por la linea de fuera. Asi tendras un margen de costura.

NO CORTAR EL LADO DOBLE.

NO VACIES LA PINZA, LO QUE QUIERO DECIR ES QUE NO DEBES RECORTARLA!!!


------------------------------------------------------------


The first thing you need to remember is that when you do a pattern is that afterwards you're going to sew it, so you need to leave an space for this matter, a space that is called cutting space.

ALWAYS REMEMBER TO LEAVE IT.

The suitable
seam allowance is of 1cm in the sides and two in the hem and the waist.
Speaking about the skirt, we're going to follow this steps:


1) Fold the fabric, leaving the good side in the inside.


2) Set the pattern, I mean, put the straight side of the pattern against the fold line. The goal of this is to have a pattern piece that is cut out without a center seam.


3) Fasten the pattern against the fabric with pins. Try to use the less possible because if not you can leave holes.


4) Use a pencil to mark over the fabric the sides of the pattern. Remember to don't mark the fold line because you're not going to cut over it.


5) Before cutting you should mark another line of 1 cm next to the sides and 2cm in the hem and waist. Forget about the fold line.
YOU DON'T HAVE TO MARK ANYTHING THERE.


6) Now you should cut over the cutting lines. DON'T CUT THE FOLDED SIDE!!


DON'T CUT THE DART!!!